You will be apt to overlap this origami Bunny with comfort if you’ve in any way wrapped a folded-paper crane. This bunny is a beautiful accessory to other origami designs for Eastertime displayed at Origami Core.
Origami
Which is frequently correlated with Japanese tradition, origami is the craft of paper folding. The expression “origami” is utilized as a comprehensive word for all folding applications, in common practice, despite their history of invention. The purpose is to convert a smooth equilateral piece of paper into a perfected figure by sculpturing and folding methods. Advanced origami experts usually repress the value of markings, cuts, and glue on the sheet. Origami specialists frequently employ the Japanese term kirigami to relate to ideas that apply snips.
A few fractions of major origami folds can be connected to a diversity of methods to create complex layouts. The most famous origami figure is the Japanese paper crane. These patterns start with a rectilinear piece of paper, in common, whose surfaces may be of various patterns, shades, and prints. Which has been honed following the Edo era (1603–1867), popular Japanese origami has usually been less severe regarding these practices, seldom trimming the paper or utilizing nonequilateral pattern initially. The fundamentals of origami are likewise applied in packaging, stents, and other construction purposes.
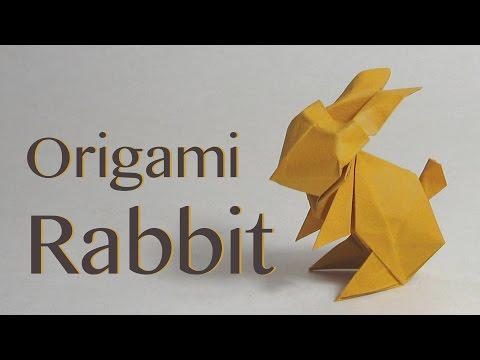
Origami Rabbit
This beautiful origami bunny gets to its feet and would get a fabulous furniture design and, certainly, a present!
Materials
Colored Papers (preferably 80gsm)
Pen Knife
Ruler
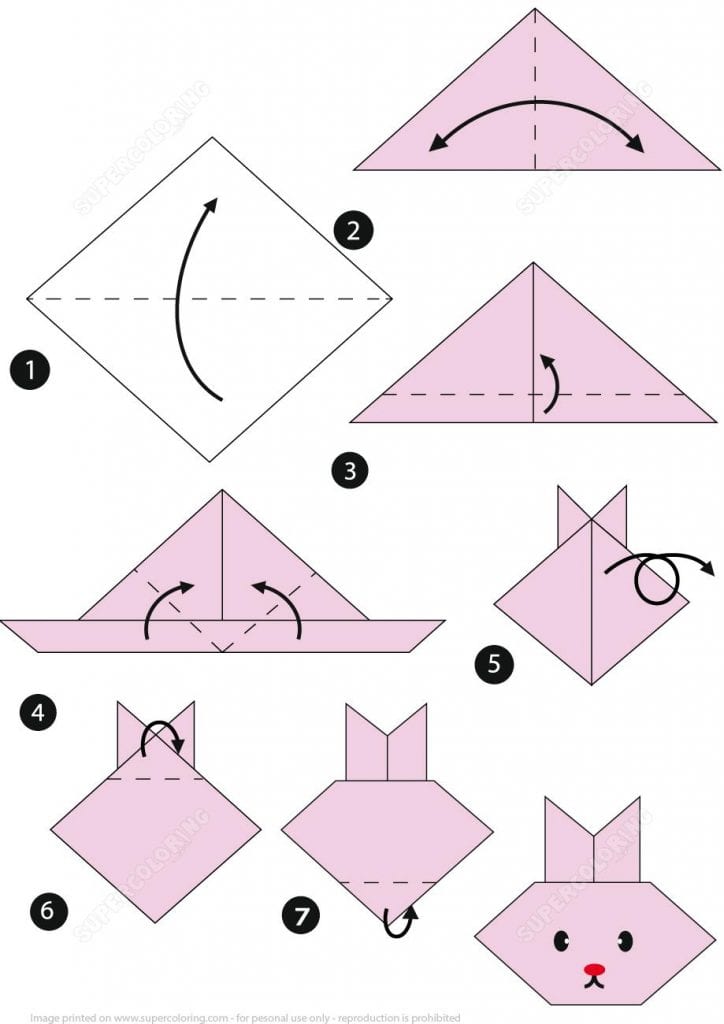
Instructions
- Digitize and print patterns in tinted papers. Suited to A4 capacity when printing. Then cast along dashed marks. You must hold 2 mini square, 1 big, and 1 mediocre outlines.
- Get either one of the square patterns (work larger bits for amateurs). Overlap it toward halves. The impressed surface must be brazening out. A mark and a figure must be viewed on each surface of the overlapped paper.
- Open. The unshaded surface of the paper must be siding you. Overlap the sides of the paper into the middle ridge. You must view the figures siding you.
- Overlap all 4 niches to the centerline. After that, mountain fold the sides to the middle.
- Open. Squash fold solely 4 niches.
- Overlap the 2 emerging folds over to the opposite surface and flip around.
- Flip over and overlap the figure in half to create a ridge.
- Produce 2 valley folds on the unshaded part of the figure. This will make the bunny’s ears.
- Flip over. Mountain fold the head.
- Valley folds the figure in two. You’ll start to see the bunny becoming definite. Lightly drag the ears of the bunny apart from the frame and then wrinkle on each surface so that the head holds up orderly.
- Create a pre-ridge on the bunny’s snout and then create an inside underside crease.
- Pre-ridge and produce a reverse fold at the rearguard of the bunny. This will make the limbs of the bunny.
- Pre-ridge and perform another reverse fold at the base extremity of the bunny.
- Press the head concurrently at the foot of the ears. Then mold ears.
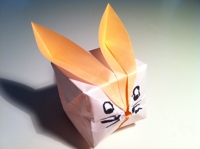
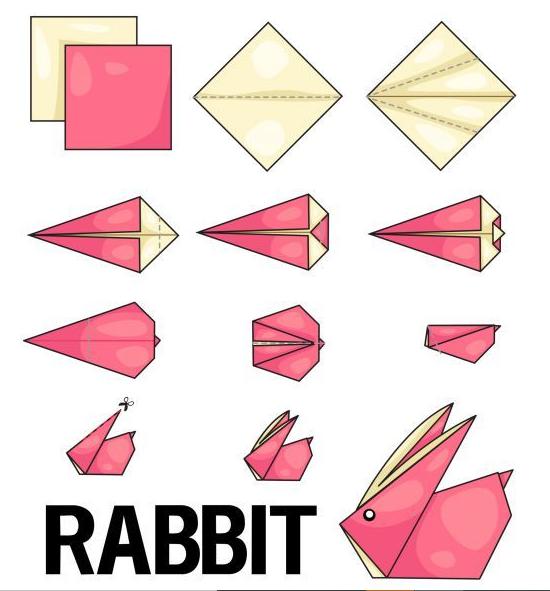
Fat Origami Rabbit
A portion of what causes humans to admire bunnies is that they’re plump, though if you’re forming an origami bunny that hops, it’s working to stay a bit slant (so it can bounce grander, without a doubt). Supposing you’d favor a more lethargic, heavy (for example, pliant) bunny that doesn’t spring but merely rests there and appears adorable, this section will explain to you on how to create one.
Instructions
- Cut a sheet of construction or printer paper or take a sheet of origami paper into 13 centimeters by 13 centimeters (5 inches) square.
- Overlap the paper cornerwise, and wrinkle the paper properly.
- Overlap, wrinkle, and open the paper corner ways repeatedly, though this point the opposite approach.
- Launch the paper down in the center and draw the planes up a bit; hence they’re leaping out a bit.
- Overlap the sides of the initial tier up to create a diamond.
- Get the surfaces of the diamond and overlap them in so that the points are meeting the middle of the diamond.
- Hold the triangles and force a little on the plane, so there’s a small “pouch.” Next, use the tip of the diamond and placed it in the “pouch.” Make this to both surfaces.
- Turn around the paper.
- Overlap the edges up to create a diamond.
- Turn the right cover of the diamond over such that it’s pressing on the left facet of the diamond.
- Overlap the tip of the right view until it approaches the fold.
- Turn the right view back across to the right.
- Bring the left cover and turn it to the right surface.
- Bring the tip of the left cover and crumple it until it touches the middle fold.
- Turn the left-wing of the bunny back over so you are on the equivalent surface you were on previously. The bunny must be balanced.
- Get the first tier and overlap both sides until they reach the fold.
- Push open the initial laps and force down the tips to create a triangle.
- View at the face of the bunny. There must be a gap that marks in at the interior of the bunny. Place your mouth toward it and puff. This must expand the bunny.
- Outline some smile, nose, whisker, and eyes for your bunny’s face.
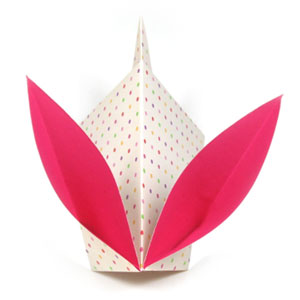
Origami Rabbit – for Kids
Materials
Origami Paper
Sharpie
Instructions:
- Collapse your paper in two to create a triangle.
- Overlap the ridged surface of the triangle up nearly 3/4″.
- Overlap one side approaching the middle, get together the details, and ridge.
- Balance it on the opposite surface.
- Flip it over, and overlap the base nearly 1″. This will be the foundation.
- Turn it around.
- Overlap the peak point within to form the pinnacle of the bunny’s head. Ridge.
- Provide your bunny a look. Utilized Sharpie since colorfast pens would spread on this paper, though you may desire to try with various sets of illustration accessories. Create one or produce a group.
This origami bunny is simple to fold and seems considerably great too. It would be a fabulous outline for children and parents during the Easter season.
Instructions:
- Begin with the design or color in reverse.
- Overlap the paper in two to produce a triangle.
- Unfold the paper back into an equilateral and overlap both views to coincide with the ridge in the middle.
- Overlap the right point across to the left.
- Momentarily overlap the wing back up nearly 2/3 of the design.
- Invert the paper across the back end. Notice the bar marks on the left? You have to crop on that mark, approximately 1/3 of the range.
- Promptly lap it in two.
- Considering you’ve cast, you can presently overlap the left edges up on both views of the paper.
- And you’ve made an origami bunny.
Tips and ideas for the Origami Rabbit
- The paper can be a mixed shade on each plane or the corresponding shade on both surfaces.
- Begin with the colored front for a white-faced bunny if you utilize paper with a contrasting shade on each surface –for instance, colored on one side and white on the opposite.
- They do manage to generate, so produce multiple bunnies!
- Granted that your original several origami bunnies get up a bit wrinkled, creating a few of them will append to your paper-folding abilities.